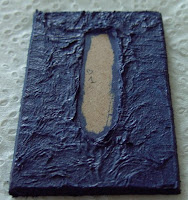
After the mandatory step of getting rid of all the flash around the various moulded parts, the first job is to prepare the base for the ships. The way I do it makes it necessary to have unpainted ships since each base will be made to the "exact" shape of each figurine.
 I am using 40x60mm masonite pieces as bases. The length of the bases depends on the size of the ship. Since I cut the pieces with a wood saw, a bit of cleaning is needed at each sharp end, which I chose to chamfer.
 I use the same method as described here and there, and the hulls of the figurines become templates for the shape of the waves around the water line. I am convinced that there is no difference between the British and French hull models but then, whatever the figurine, the base is individually tailored.


I paint each base with a base coat of Regal Blue, making sure I do not miss any crevice. Once dry, I dry brush some Shadow Grey, heavy handed as this colour should reflect the colour of a grey sky on the sea. Consequently, only the deepest recesses should keep their dark blue colour afterwards. Finaly I dry brush some Skull White over the tip of the waves to simulate froth. I try to accentuate the visual effect at the back of the hull to simulate the wake of the ship.
 This final picture shows the four bases after they underwent the same painting stages.
4 comments:
Good brief and this fill someone in on helped me alot in my college assignement. Thank you for your information.
Brim over I acquiesce in but I about the post should secure more info then it has.
Ciao Xavier, could you shortly describe the method how you made the seascape from kleenex for not French speaking people like me? Thanks
I saw that the forum is closed for non-registered viewers... If I remember well, you just have to dilute some water based glue (PVA) in order to make it as liquid as paint. Then you can paint this solution over the base of the ship. Be generous, it will take lots of time to dry anyway!
Tear a piece of Kleenex of the desired size and place it over the glue. It will absorb as much of it as possible and you will be able to "sculpt" it to make waves, by gently pushing with a brush. Just make sure not to tear it.
A Kleenex being multi-layered, it can be shaped in a very interesting manner. If you want to create big waves, you can stack several pieces to achieve the desired effect. The only difficulty is how much to dilute the glue. The more glue there is, the stronger the waves will be once dried, and the easier you can paint them. The more water you add, the easier you can "sculpt". However that is not a very serious issue. Have fun!
Post a Comment