I created this blog because I could not find the kind of tutorials I needed for some models and miniatures I wanted to build. I hope it will be a useful source of information for anyone who may experience the same lack of first-hand, step-by-step reports.
I am not an expert by any means, so feel free to comment my posts or to contact me to share your advice.

Friday 30 October 2009

Langton HMS Victory part 3

I would say that I am finished with her! I glued the sails onto the masts and started the rigging operations. The standing rigging is a bit stressful: in order to get straight pieces of string between the masts, they must be stretched a bit, but the material allows for such a load. After that, the running rigging looks like a walk in the park! All those small ropes help a lot to stiffen the model, and I even think that they should be enough to make the cyano glue redundant.

The instruction leaflet made by Langton is very helpful but there is a gap between the sketches explaining the rigging and the figurine. I had to rely on side information from Longridge to make some things easier or more logical. I voluntarily omitted the shrouds and ratlines because I think there is no easy way to build some that would not look too heavy on the model. The usual screen cut to size and glued into place looks bogus anyway. However, it would be difficult to try to rig the shrouds as in real life since the masts would just disappear under layers or string! I also omitted flags and standards because I predict a short life time on a gaming table.


See also HMS Victory part 1 and HMS Victory part 2

Sunday 25 October 2009

Small fleet step by step: preparing the models

With new Langton miniatures, there is a little work to be done before they are ready for painting. Right out of the box, the models show very little flash left to remove (with a sharp edge, by scratching the flash rather than cutting it out). However, the pewter used is a soft metal alloy and can bend very easily. It is therefore very important to check the straightness of the parts, the way they fit together, and to correct anything that looks out of shape. For that kind of work, a sharp blade and small files are your best friend.

The second thing is worth being done before any paint job is started: dril the models so as to accomodate some passages for the rigging through the hull. On the HMS Victory miniature, the location of each hole is obvious thanks to printings made by moulding. In the present case, I suspect that either the printings were not there or the moulds are worn, because I could not find any. I had to rely on the locations mentioned in Langton's rigging handbook (end of the channels for the side holes), but that is not really an issue. What could have been, however, is that a 40 gun class ship is way smaller that a three decker like the HMS Victory. Question is: is it possible to use the same bit diameter, is there enough room for holes? Answer is yes. I am using 3 sizes: 1/32", 1/64" and 3/64". The largest one is useful for the bowsprit. It is almost the same size as the bowsprit and helps to provide a socket for attaching it to the hull. It is not necessary to drill deep as you just need to make sure that the bowsprit has a un-movable and strong base of attachment. The smallest bit is used for the main mast as a way to attach the main stay and the preventer stay. On the HMS Victory I knotted them around the mast but the off scale strings make a bulky aggregate.


With the holes at the right places, the miniatures look like the pictures on the left. On the French ship I saw that the sails on the bowsprit were in the way of the masts. Since the sails are one piece with two atach points to the bowsprit, I could not bend them to point towards the right location, so I bended the bowsprit instead. Not the best solution but one that should work eventually...

Finally, I made one painting jig for each model with bottle caps. That will allow me to spray the primer and paint every part with no difficulty.

Saturday 24 October 2009

Small fleet step by step: basing the ships

I was satisfied enough with how things went with the Langton HMS Victory (even though it is not quite finished as I am typing this), and I thought that it was worth trying to make small fleets for Close Action. I decided to walk this road carefuly and my final choice was on a 2 vs 2 scenario for Close Action: French ships Sultane and Etoile engaging British ships HMS Creole and HMS Astraea. All four are 40-gun class ships (ref NF7 and NB49 from Langton), meaning smaller ships than the HMS Victory.
After the mandatory step of getting rid of all the flash around the various moulded parts, the first job is to prepare the base for the ships. The way I do it makes it necessary to have unpainted ships since each base will be made to the "exact" shape of each figurine.
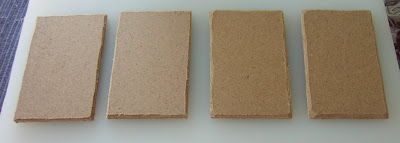
I am using 40x60mm masonite pieces as bases. The length of the bases depends on the size of the ship. Since I cut the pieces with a wood saw, a bit of cleaning is needed at each sharp end, which I chose to chamfer.


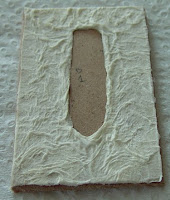
I use the same method as described here and there, and the hulls of the figurines become templates for the shape of the waves around the water line. I am convinced that there is no difference between the British and French hull models but then, whatever the figurine, the base is individually tailored.


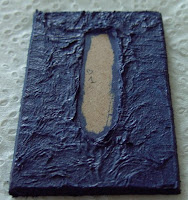
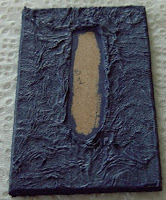
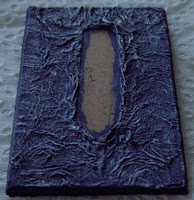
I paint each base with a base coat of Regal Blue, making sure I do not miss any crevice. Once dry, I dry brush some Shadow Grey, heavy handed as this colour should reflect the colour of a grey sky on the sea. Consequently, only the deepest recesses should keep their dark blue colour afterwards. Finaly I dry brush some Skull White over the tip of the waves to simulate froth. I try to accentuate the visual effect at the back of the hull to simulate the wake of the ship.


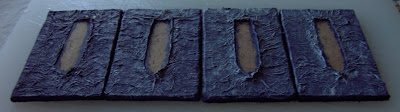
This final picture shows the four bases after they underwent the same painting stages.